Back to TheWorxHub for Senior Living Main Menu
Creating a Room Booking Bill
With the Room Bookings Pro Edition, you can track and manage billings pertaining to room bookings, activities, and catering. Once you have added the fees to your account, you can create invoices to bill for room bookings.
Watch the Video Tutorial:
Setting the Billing Mode
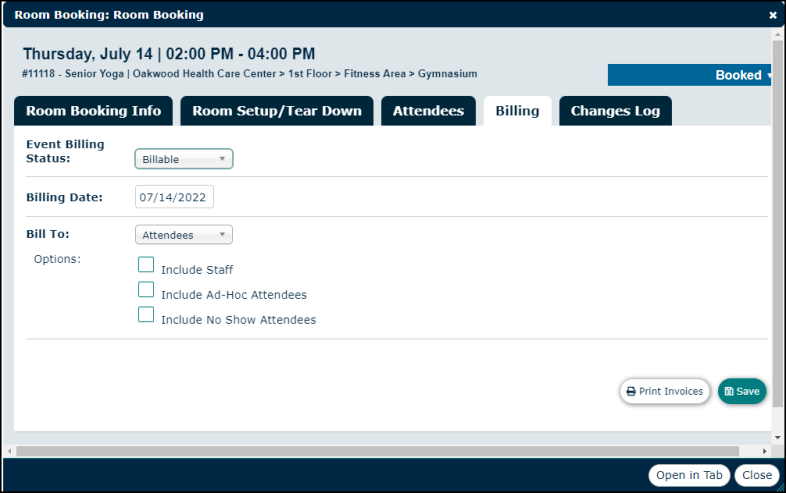
When creating a room booking bill, you must select a Billing Mode to tell the system how the charges will be applied.
- Access the room booking details either through search or the calendar.
- Click on the Billing tab to define in detail exactly how the event should be billed.
- Select Billable from the Event Billing Status drop-down menu.
- Select Attendees, Department, or Host from the Bill To drop-down menu.
Bill To Attendees
This mode is common for some resident activities where there are fees for participation and catering costs. In the Attendees mode, all residents on the Attendees tab who were marked as "attended" will get individual bills.
- Check the Include Staff box to also create a bill for any staff members who attended.
- Check the Include Ad-Hoc Attendees box to create a bill for family, caregivers, or additional people who have attended.
- The Include No Show Attendees checkbox overrides the default of only creating bills for those who attended.
- If you would like to create a bill for those who cancelled their sign-up or for those who just didn't attend, use this option. You would typically have a specific cancellation fee established to charge in those cases.
Bill To Department
Use this mode when the fees will be deducted from a specific department's budget. For example, catering fees can be charged to the Maintenance department for providing refreshments to the staff attending an on-site training session. *Note: When in Department mode, TheWorxHub doesn't require attendees to be listed on the Attendees tab. You can pick a department and Staff contact when creating the bill.
- Select the Department name from the drop-down menu.
- Select a Staff contact for the department.
- Click Save.
Bill To Host
In this mode, you can choose one person who is responsible for the bill. The person must be an attendee. For example, if a resident threw a surprise party for his wife in the private dining room, he would be charged as the host, and pay any costs for room fees or catering.
- Select the Host from the Select Host drop-down menu.
- Click the plus icon (
 ) next to the drop-down menu to populate the Catering Charges to Allocate and Bill Details sections below.
Catering Charges to Allocate
This section allows you to adjust catering charges before assigning them to a responsible party under the Bill Details section. Any charges associated with catering items that have been added to this room booking will populate automatically.
- If applicable, select a Billing Code from the drop-down menu.
- Adjust the Quantity and the Price/Qty (price per quantity) if needed.
- Click Split Charge to divide the charge evenly between all responsible parties under the Bill Details section.
- Click Assign Charge to manually select the party responsible for a particular line item.
Add a New Charge
You can add additional charges to the invoice when needed.
- Click Add a New Charge to assign additional charges to all parties listed in the Bill Details section.
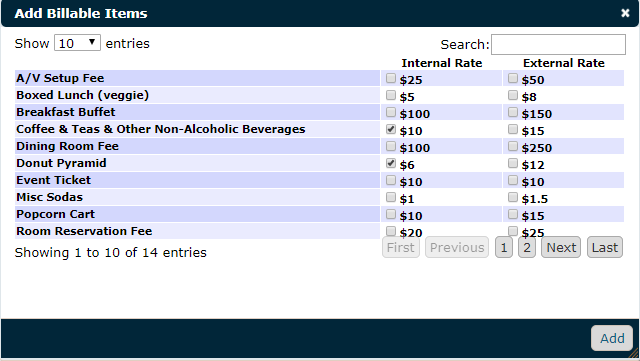
-
In the Add Billable Items window, select the Internal Rate or External Rate checkboxes for all the charges you wish to include on the bill.
- Click Add.
Bill Details
If you have set up charges to always be included by default, those charges will automatically be displayed in the Bill Details section. Once the Bill To has been determined and charges have been allocated, the Bill Details section will be populated with the parties responsible for billing, as well as the various charges applied to them.
- To assign additional charges to a specific person, click the dollar icon (
 ) next to their name.
In the Add Billable Items window, select the Internal Rate or External Rate checkboxes for all the charges you wish to include on the bill.
Click Add.
- To track when the invoice was sent to accounting for processing, enter the Date Sent to Accounting.
- To delete any charges that should not be applied, click Remove.
- Click Save to finalize the changes on the Billing tab.
Exporting Invoices
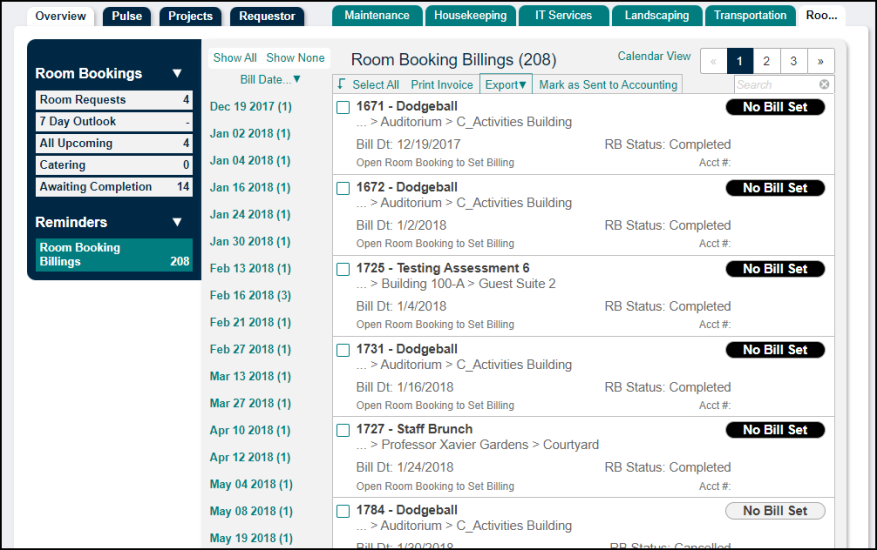
Once your invoices have been saved, they will be listed on your Room Bookings Dashboard. You can then export them to Accounting for processing.
- Click on the Home tab and then on Overview.
- Select the Room Bookings tab to view the Room Bookings Dashboard.
- Click on the Room Booking Billings tab on the left side of the screen.
- Check the boxes next to the events you need to export. If you need to export them all, click Select All at the top of the list.
- Click the arrow next to the Export link and select the export option you'd like to use.
- Once you have successfully exported the invoices, be sure to click the Mark as Sent to Accounting link that appears when you hover over the event. This removes the event from the Room Booking Billings list in order to make room for the next month's billings.